The Scientist
Creatively working on an advertising campaign is a very different process to working with families, domestic clients or on personal projects. If working in the commercial field as a Photographic Artist is something you aspire to, this article should assist in providing you a guide.
The Concept of the Shoot
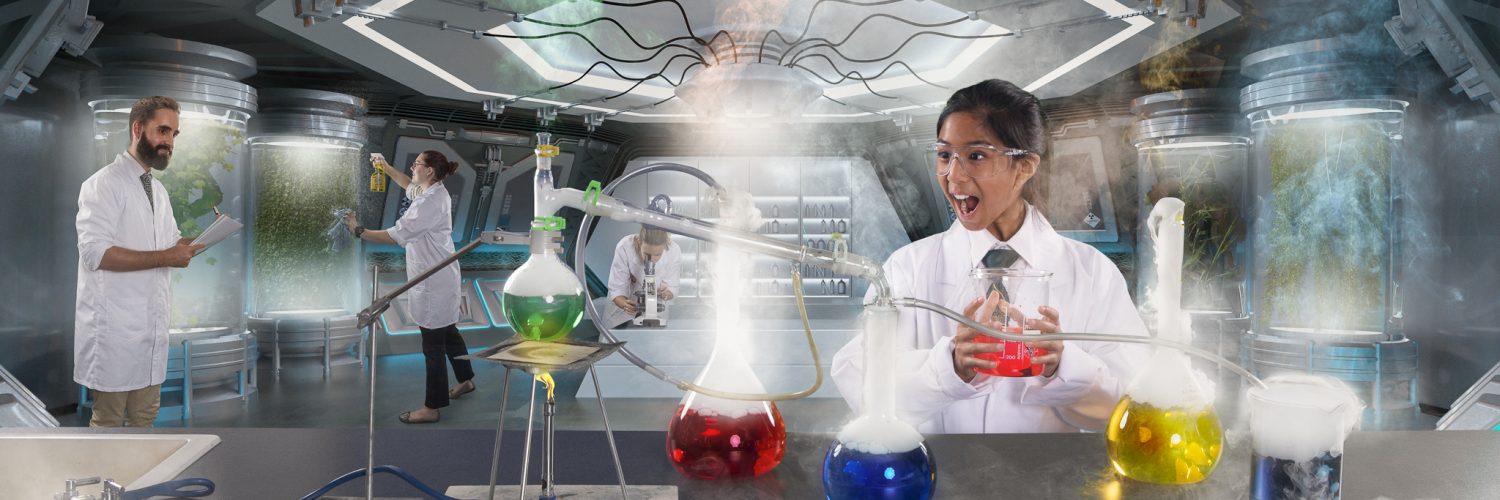
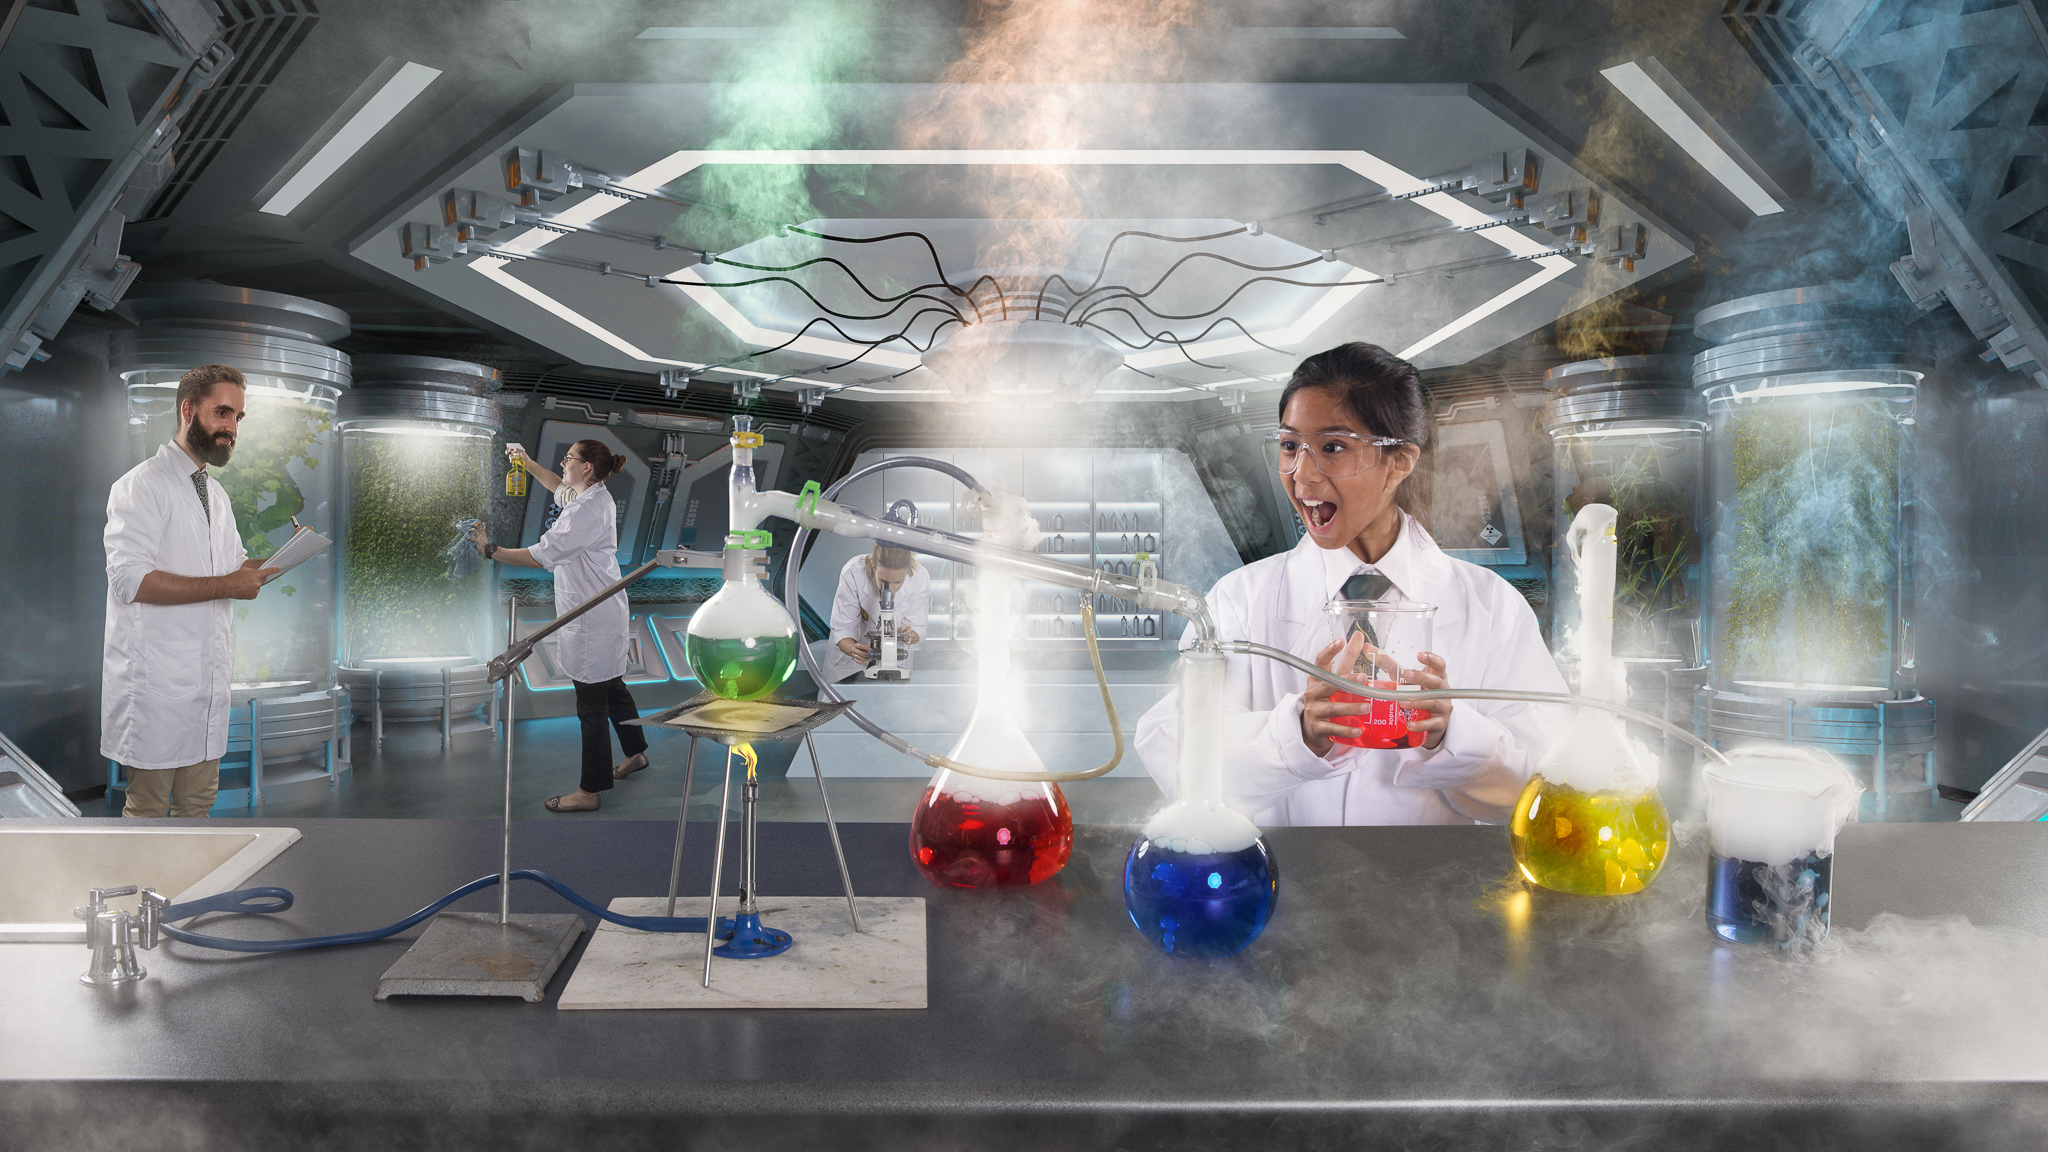
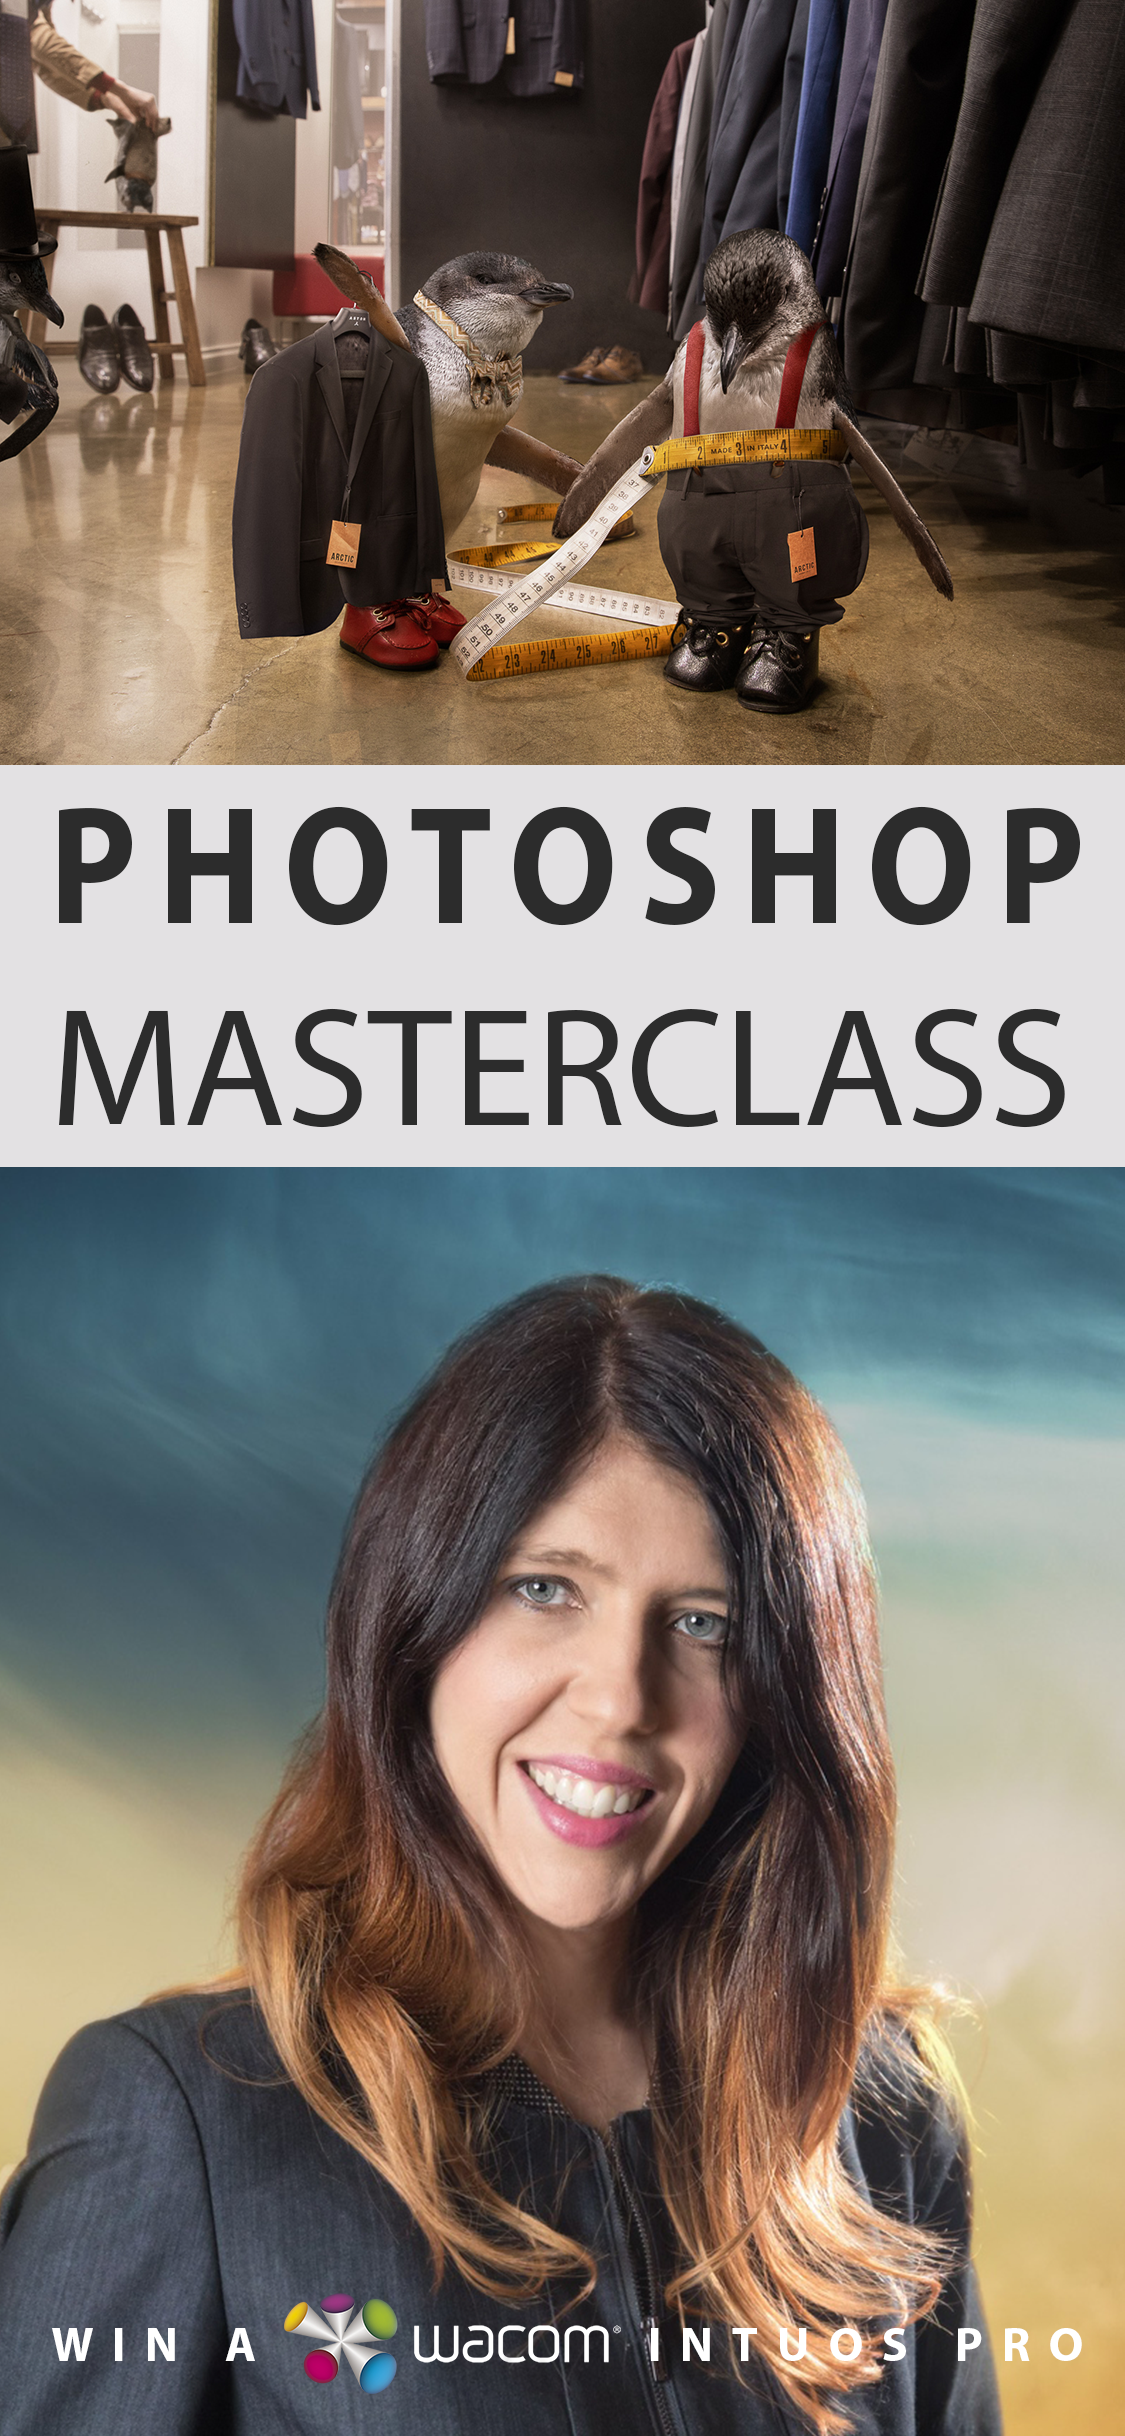
Hillcrest Christian College commissioned me to create a series of 4 advertising images as part of their campaign ‘Your Future Today’. The concept of the campaign was to showcase a young student living out their future career dream. Think of it as a jump forward in time for the student, who retains their current age, enthusiasm and school uniform, while all around them is their future career scene.
This article focuses specifically on ‘The Scientist’, an artwork that throws an aspiring young scientist into a sci-fi laboratory of the future, complete with fellow adult scientists an cutting edge, visually exciting experiments.
The Background
Despite a concerted effort trying to find a futuristic Sci-Fi Lab to photograph, I came up dry. Most of my work consists of me photographing every element, however there are times that this proves impossible, and the more important task of creating a strong image for the client, means I turn to other sources.
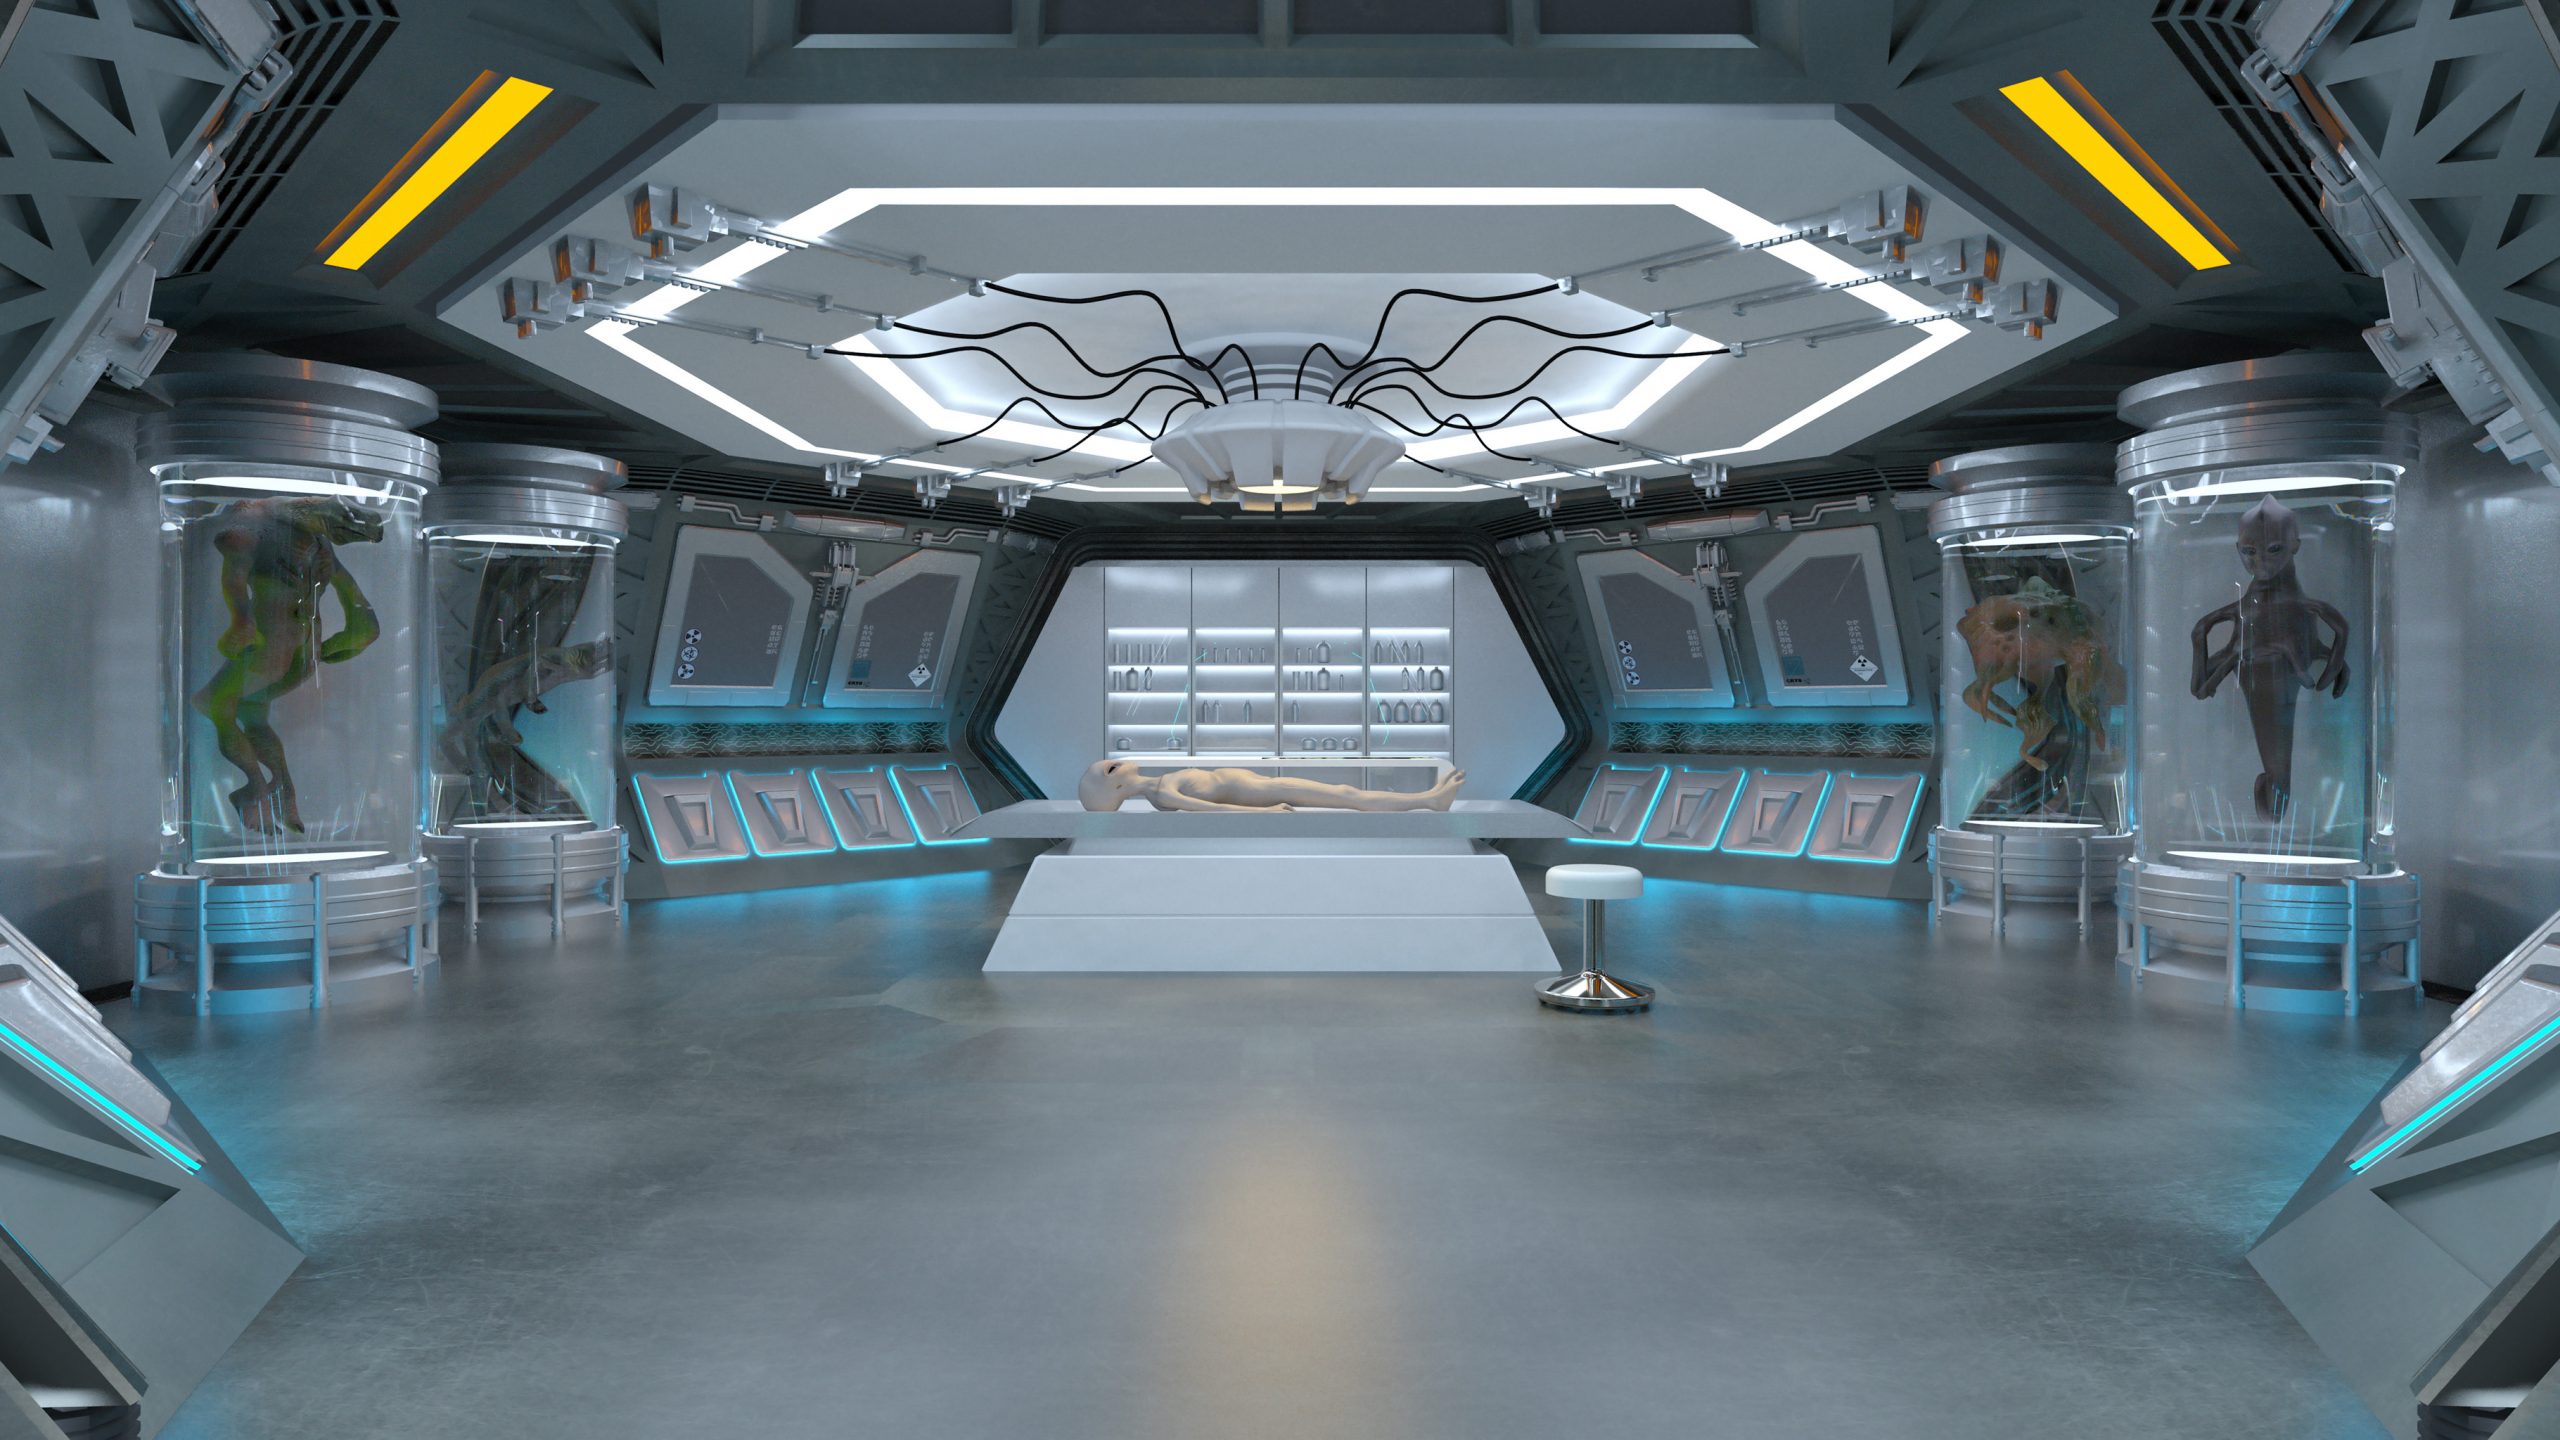
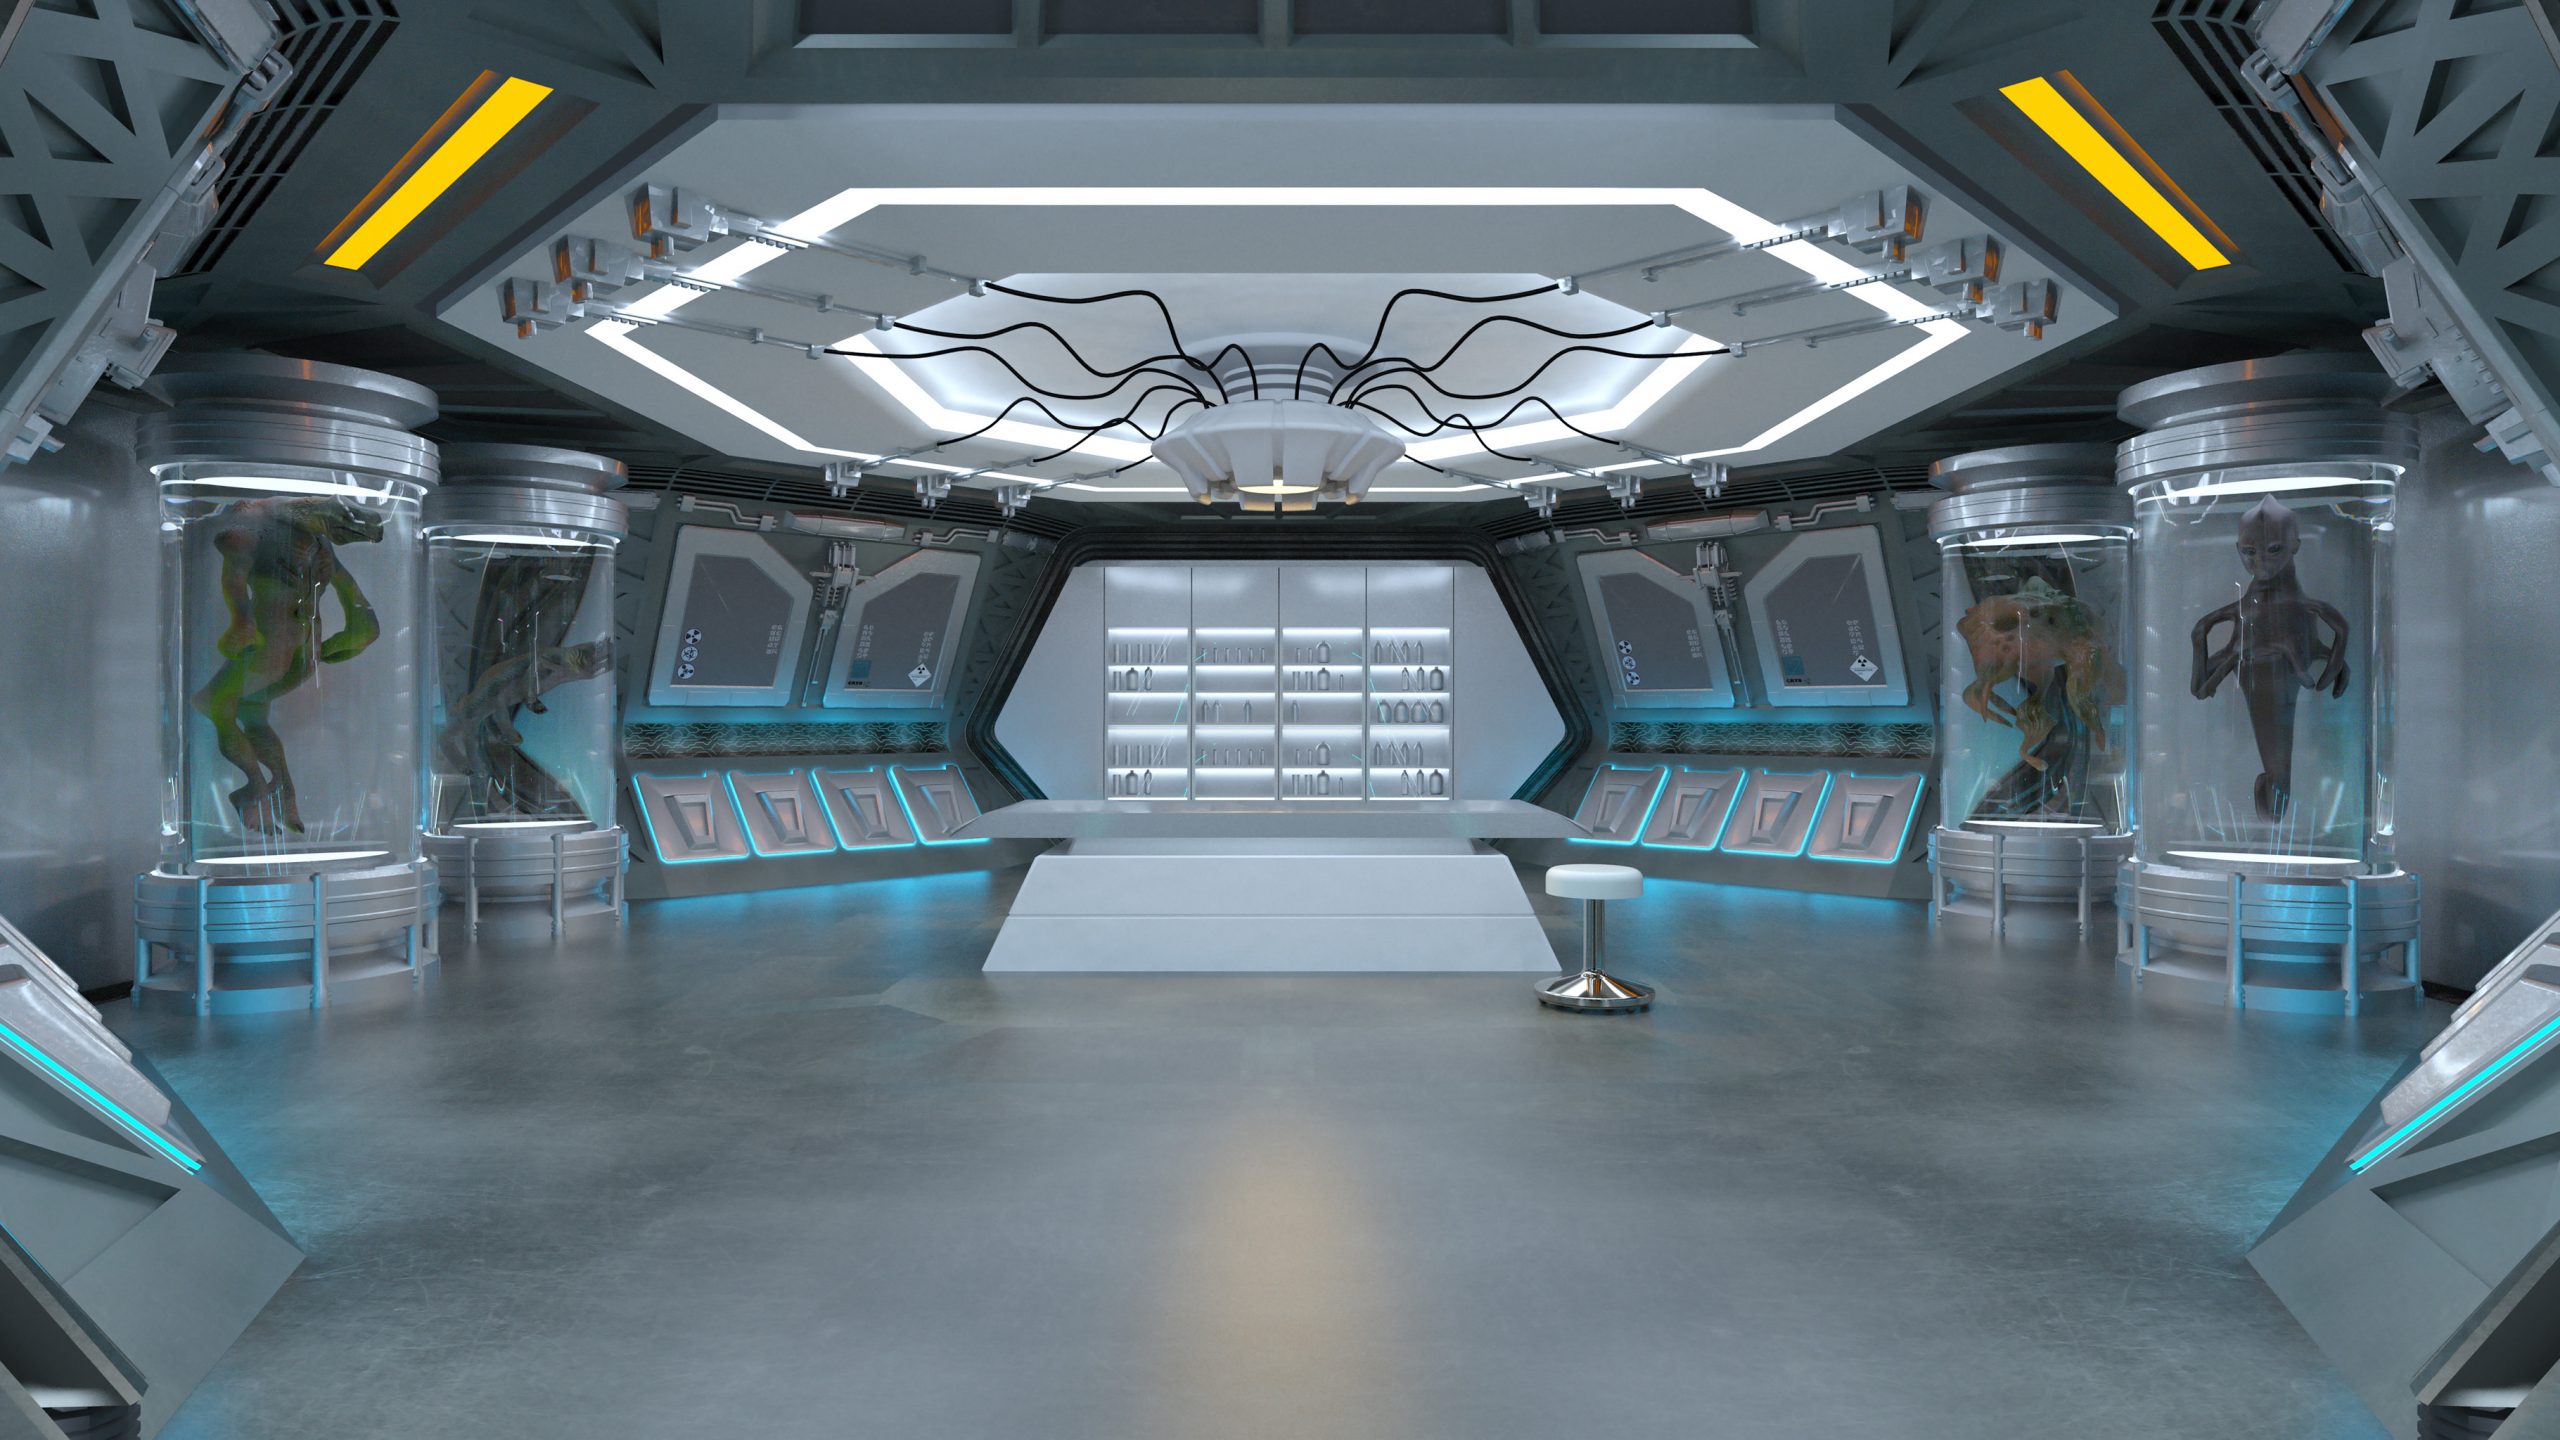
For ‘The Scientist’ I searched through Adobe Stock to find some rasterised 3D imagery that suited my vision, minus the aliens. Because this piece was to advertise a school, we couldn’t go too ‘X-files’ with the image, so one of the first things to go (and be replaced by foliage and content aware) were those cute little aliens…
Lighting Setup
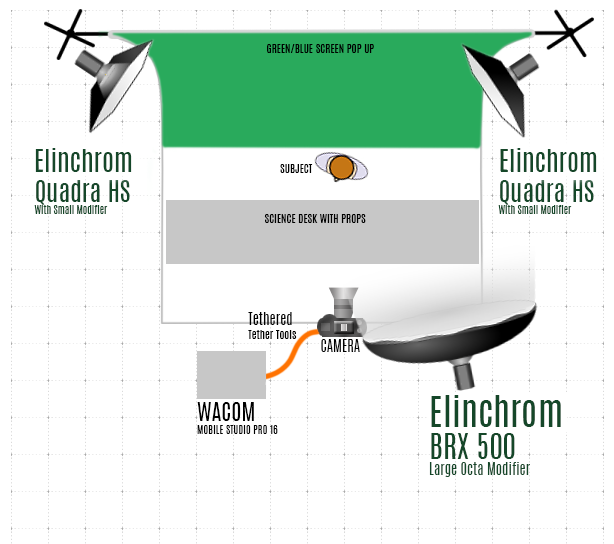
Starting with the background image I already new the type of lighting scenario I needed. The Sci-Fi lab was a mix of light, coming from above, behind and in the foreground. I knew I wanted more of a soft spread of rim light than my usual lighting set up. Traditionally I’ll shoot with two strip light modifiers with grids. This produces a clean and crisp rim light that doesn’t blow back into the camera and isn’t too soft around the subject. For this scene though I actually wanted a bit of spread, and in particular with the scientists that would be closest to the light sources from the tubes, I wanted a wider spread of light. I opted for round small Elinchrom modifiers that fit to my portable pack. I used the Elinchrom Quadra HS heads for the rim lights and the Elinchrom BRX 500 with a large round modifier for the front fill, positioned next the camera and slightly above.
Challenges to Overcome
Before my subject arrives I spend time, tethered to Capture One, testing my scene. One of the biggest challenges of this set up was using a stock image rather than one of my own.
When I shoot with my own photographs as the background, I have a clear understanding already of the height of the tripod, the perspective, lens, and angle.


When matching to a stock image, it’s important to look for visual clues to understand how to match the scene. With this one I original had my camera pulled back too far, and it was too low. When bringing the test shots into the image I carefully matched the desk perspective with the floor and wall perspective until I had the correct angle – which ended up being closer, with a wider angle shot and the camera at head height position.
Tethering Workflow
I have found tethering directly to my Wacom Mobile Studio Pro using Capture One has significantly sped up my final editing process. Accuracy is achieved every time by me having full control over the image, and pulling selects into Photoshop to mock up the final piece. If I find that something isn’t quite right, be it the lighting or the perspective, I can easily re shoot on location after checking. Tethering is also a great way of getting the team involved, and the client. For this shoot the marketing manager was available to make comment. This process ensures that the client is happy ahead of time and alleviates the costly process of a reshoot on another day.
Tethering to Capture One is speedy. I’ve created a custom workflow that gets me straight into Photoshop from Capture One and opens up my images in Camera Raw, followed by converting them into Smart Objects ready for editing into my composite. See this post for further detail: https://storyart.education/catalogue-stock-collection/
One of the other benefits to direct tether to my Wacom Mobile Studio pro is that I can start work straight away on the end product, with all my captures safely stored on the hard drive in RAW.
Post Processing
Of course, it’s the post processing that takes the most time on a project like this. This image took approximately 10 hours in Photoshop. Even when I think I’m finished, I often set the image aside, print it and analyse it and come back and spend more time perfecting it before I deem it complete. You can see the speed edit process in the behind the scenes video.
The Crew
This shoot required some key players in order to pull it off. Our model, Olivia Sebastian (10), comfortably played the role of young scientist. Her expressions were animated and she was very comfortable with the camera.
The Hillcrest Christian College lab assistant, Elizabeth Cardoza, handled all of the chemicals, allowing me to focus on the shoot and our model to stay safe.
Ryan Sebastian, who completed his Secondary School studies last year at Hillcrest, and is now studying the Arts as part of his further education, filmed all the behind the scenes footage. Every time I undertake a creative shoot I like to have it filmed, so that I can put together the behind the scenes video to tell the story.
Stuart Alsop, husband extraordinaire, took the behind the scenes photos and helped direct the shoot.
Our other models, were teachers from the college, and they played their parts well, fitting into to the scene to help convey the story.


The Animation
As the creator of Artymate.com, I can’t help but animate my images. This one will be showcased on the College Website, on the foyer TVs and on social media.
Gear List
Canon 5Div
Sony A7rii
Elinchrom BRX 500 and 2 Quadra HS heads, Elinchrom Skyport trigger
Mac OS X
EIZO ColorEdge CG318-4K
Canson Infinity PhotoMaking Rag
Props
Dry Ice from BOC Gas
Food Colouring
Science Flasks
Science Labratory
Lab Coats and Goggles
See the transformation:


Add comment