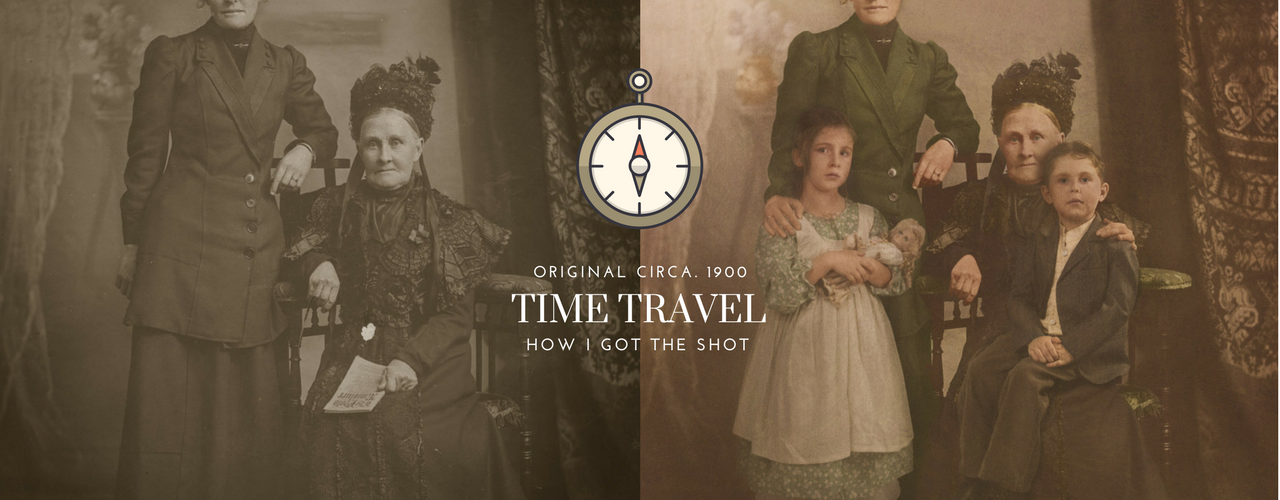
How I got the shot of my children and their great great great great grandmother and great great great grandmother – Step by Step
My mother found an old photograph, dating back to the early 1900’s, of my Great Great Great Grandmother and my Great Great Grandmother.
Family history is a favourite pastime of my mum’s and seeing this historic photo, made me wonder what it would be like to sit down and talk to these relatives. How insightful would it be to hear their life journey. How incredible would it be for them to meet their Great Great Great Great grandchildren, my children, Jazzlyn and Asher.
Time Travel
Through the power of Photoshop, some olden days clothes, and sullen faces, we were able to composite our children, Jazzlyn and Asher into the photograph with their Great Great Great Great Grandmother and Great Great Great Grandmother.
This article takes you through the steps from start to finish of how I achieved success in fooling most of my family and friends in thinking that the final photograph with Jazzlyn and Asher was the original from the early 1900’s


Step 1: Examine the Portrait
The first step in creating a convincing composite is to study the scene you are placing the subjects into. The original image, though over 100 years old, was still in quite good condition. The image was sharp (for that time frame) and had only a few visable scratches which were easily fixed in Photoshop.
Step 2: Source the props and costumes
In order to be as authentic as possible it was important to gather clothing and props that looked like they were from a similar era. I already had some outfits that would suit, but I visited my local thrift store for the last few pieces.
When I go to an op-shop (thrift store) I find it helpful to have a Pinterest board of gathered examples that I can use to prompt ideas with outfits.
See my Time Travel Pinterest board here
I walk around the isles, Pinterest board in hand, looking for similar clothing. Even if the colour isn’t quite right, I know I can change some things in Photoshop, so I’m always flexible in my approach.
S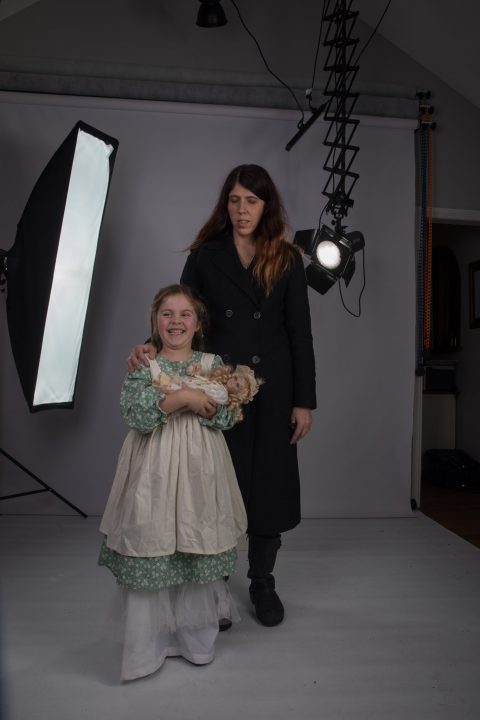 tep 3: Examine the Light and Perspective
Lighting
When setting up the studio for the shoot, I examine the original light and perspective and decide on my lighting scenario. During this shoot I first had soft wrap around light. I did alter the light to add one to the side of Asher at one point because on the original photograph the subjects were more brightly lit on this side. Later in editing I toned down the highlights on everyone to return to the soft wrap around light (which is essentially the safest to shoot in, because it can be easily manipulated later on). I used a 4 light set up surrounding the subject.
Perspective
Figuring out the perspective that a photograph is shot with can be difficult without any point of reference. You need to look at the eye level, the feet (flat, slopping down), and then run some tests.
I first visually assess the image. For this one eye level seemed to be around the middle of the photograph (waist height of the lady sanding). As the feet can’t be seen, the angle on the floor is harder to assess. I shot tethered to my Wacom Mobile Studio Pro and quickly cut out some shots of Jazzlyn to start with to check if the perspective was correct. Without this method you may go through the shoot guessing the perspective, only to come back to editing and find you’ve photographed on the complete wrong level. I always advise using a tethered workflow to make sure everything is correct in a composite situation. For tethering gear to suit your device/camera visit Tether Tools
Step 4: Choose your medium
I’ll admit it, this was a step I missed, had I thought about this prior to the project I would have saved a lot of time in the edit stage, and the children would have looked even more realistic.
My error? I shot the children on a high end, high resolution camera and the result, as usual, was beautiful sharp portraits. The problem with this? They had to be destroyed. I spent a long time and many layers changing these sharp portraits into lower quality, slightly blurred, grainy, worn images. Even still the children are perhaps a little sharp compared to their ancestors.
Going forward I would pull out one of my inherited large format film cameras and shot authentically on this. I wouldn’t use strobes I would use continuous light, and mimic the problems of the past with slow shutter speeds and the need for subjects to hold still.
If I didn’t have time for being authentic I would still re access my set up, step back to continuous light, shoot on a slower shutter speed (around 1/15) to capture slight movement as it would have been, and shoot on an older camera that wasn’t as crisp and clear.
Step 5: Capture the Expressions
How do you get children that are used to performing and smiling for the camera, to hold still and look blankly… With great difficulty! Let not the finished image fool you. There were many outtakes of crazy faces and fake smiles to contend with.


Step 6: Position the subjects to match
For this project I had to integrate two subjects into the scene to make them look like they were there. I decided to have Asher sit on his 4xGreat Grandmother’s lap and have Jazzlyn standing with her 3xGreat Grandmother’s hand on her shoulder.
In order for this to work, I had to stand in for the characters. I dressed in black to ensure easy removal and blending. I stood and sat in position to match the original subjects. I placed my hand on the children’s shoulders in a way that would blend easily into the final image and make it look like my hands were my ancestor’s hands.
As always I checked these positions were working by tethering and doing quick cutouts in Photoshop as I was shooting.
Step 7: The Photoshop Process
a) Repair the original
- I spent some time repairing the dust and scratches in the original image.
- My methods included:
- Duplicating the original layer
- Applying Dust/Scratches reduction using the Photoshop Filter until all the fine dust/dirt was removed. Don’t worry about degrading the image. We address this in the next step.
- Add a layer mask to the layer with dust/scratch removal
- Invert the layer
- Paint the areas on the mask where the dust/scratches are showing on the original layer. This is a much quicker method than using the healing brush
- Following this create a stamp visible layer Press Shift+Ctrl+Alt+E (Windows) or Shift+Command+Option+E (Mac OS). Photoshop creates a new layer containing the merged content.
- Use the Healing Brush to paint away any remaining scratches (for example the large white patch of missing photograph on the lady sitting down).
NB: This process involves using a more destructive workflow than I’m used to. However for the sake of quick repair, these steps are the faster workflow. As long as you retain the original along the way and don’t flatten it is still a non destructive workflow. When you flatten down, you lose all your changes and cannot go backwards.
- Use curves and levels adjustment layers to give your photo the right amount of contrast and detail. As your original photo would have been scanned, it’s likely that you will need to do some work to bring out the detail in the image.
- OPTIONAL: Colorise if required (I spent some time colouring this image. This process will be covered in another tutorial).
b) Choose your best shots of the subject
I started with Asher. As he was sitting on my lap in the original shot so adding him to the new photo just meant ensuring his head and body was the right size. To do this I masked myself in and cross checked my size against my 3xGreat Grandmother. I added Jazzlyn in the same way, although I had to merge 3 shots of her in because the best face shot was not the best feet shot, or hand on shoulder shot.
c) Add Shadows
Using levels adjustment layers (see Basics Series; Creating Shadows and Creating Realistic Shadows Tutorial) add shadows under and behind your subjects being careful to watch the light direction and original shadows as a reference.
d) Tone to match
(Colour version) Use levels and curves adjustments to match the subjects tone to the new tone of the colourised photo. (More on this in the colourisation tutorial coming soon).
e) Adjust contrast and highlights/shadows to match
Use adjustment layers and paint onto your subjects (clipped) where needed. See Basics Series P6; Shading and Lighting
d) Destroy quality
To take a sharp crisp image and match the original quality of the photo, I did the following:
- Duplicate subject layer (clip to original)
- Lens Blur (filters) with noise
- Reduce opacity, paint on and off with mask
- Duplicate subject (clipped to original)
- Add noise (monochrome)
Final adjustments will depend on your image but I used the following techniques to bring it all together:
- Adding Texture overlays (see Creating Painterly Photographs in Adobe Photoshop)
- Stamp Visible Layers and adding noise
- Adding Colour Lookup Table layers (see Using Colour Lookup Tables; LUT)
- Finishing the image colouring in Lightroom (see Basics Series P8; Finishing in Lightroom)
SPEED EDIT
Hilariously I had many of my friends tricked with this picture. I posted the final on facebook in Black and White and shared that it was a photo my mother had found of our relatives. Many were astounded at the resemblance of the children in the photo to our own children, Jazzlyn and Asher. A few thought that maybe I had photoshopped it… I had a some fun stringing them all out before revealing the truth.


[…] Want to know how this was done? View the speed edit to watch the work in progress (yes I had to hand pose for this). If you’d like to learn more about the steps visit: Time Travel: How I got the shot […]
[…] When it comes to the shoot itself, there were two important things to pay attention to. First, the facial expressions. People in old photos usually have that specific, kind of blank expression. So, it was important (and fairly difficult) to have the kids pull it off as well. The final image shows they made it, but there were plenty of silly faces and fake smiles before that, as Karen says on her blog. […]
I love it – great job!!! What a cute idea!!!!